6 QuickBooks Online Accounting Tips
QuickBooks is an extremely versatile and flexible accounting software. Millions of small business owners all around the world use the app for bookkeeping. Many partner with our professional bookkeeping services providers also use the accounting app to record transactions.
Before switching or filing, a proper QuickBooks file cleanup makes sure the numbers you carry forward are right.
But learning the ins and outs of this accounting software may take some time. Here we will share some tips for recording sales tax and other items using the accounting app.
1. Setting Up Sales Tax and Codes in QuickBooks Online
The task of adding sales tax for each item manually involves a lot of time. QuickBooks automates the task of recording sales tax for items. You have to set up the sales tax and codes once and the software will automatically calculate the tax when recording transactions.
Here are the steps involved in setting up sales tax codes in QuickBooks accounting software.
Step 1.
You should create a list of items and the associated tax rates. Consult the IRS website to find out the tax rate for the item.
Step 2.
Log in to the QuickBooks account. Next, you should click on the home menu. Select the Sales Tax Center tab on the left side of the screen.
Now, you will have to set up the sales tax rate for the transactions.
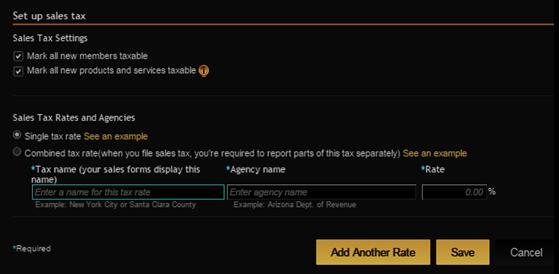
Step 3: Place a checkmark next to the following settings:
- Mark all new members taxable
- Mark all new products and services taxable
Next, you should select the Single tax rate under the heading Sales Tax Rates and Agencies. Enter the tax name displayed in the sales form, tax collection agency name, and applicable rate.
Note: You can also select the Combined tax rate option. This is required when your tax collection agency requires you to report tax state, county, and city taxes separately.
Step 4.
The next step is to enter the sales tax code. You must enter a unique three-letter code for each product or service. The tax code is written in the sales tax return file.
Step 5.
You should next select Sales Tax Code List from the list menu. The code helps you to track the taxable item. This code is applied when you sell products to customers. You can modify and delete the tax codes later on from the menu.
After you have created the sales tax code and entered the rate, the tax name and rate will appear when you create an invoice. You can select the appropriate rate for the goods.
QuickBooks will automatically apply the tax rate for the item when you create the invoice. The sale tax will be shown in the invoice nearthe total amount.
2. Creating Class and Location Tracking in QuickBooks Online
Class and location tracking features in QuickBooks Online are invaluable for managing various business segments. It allows business owners and managers to monitor bills, invoices, and other transactions. The feature also makes it easy for businesses to monitor different branch offices, departments, and team members.
Let’s suppose you have our dedicated outsourced bookkeeping team to an accountant that keeps track of your businesses located in New York, Chicago, and Washington DC. The accountant will create separate classes for each business location. In addition, the accountant can create sub-classes for different business departments dealing with commercial and individual clients.
The class tracking feature of QuickBooks Online can be applied to any type of business segment and operation. The feature helps in tracking profit and loss for different segments of the business.
With the class tracking feature, you can create two types of profit and loss reports based on the classes you have specified in QuickBooks. This gives you detailed insights into the business performance by segment and location.
How to Turn Class Tracking and Location Feature in QuickBooks?
QuickBooks Online makes it easy to set up classes and locations. Here are the steps required to enable theclass tracking feature in the online accounting software.
Step a.
Select the Preference icon from the home screen. The option is located in the upper left corner of the screen.
Step b.
Next, you should select Company Settings from the drop-down menu. You will see the following screen.
Scroll down and select Track Classes in the Categories option. You can also select the option to display a warning when no class is assigned to a transaction. In addition, you should also select Track Location to monitor the location of the transaction.
Turning on the track classes feature allows you to assign classes to transactions. The transactions can be assigned to different business segments. You can also select whether the classes should be assigned to the entire transaction or each row within the transaction.
The track location option makes it possible for you to assign a location to the transactions. You can assign sales regions, stores, and other locations to each transaction. You can set the Location Label to Location, Business, Department, Property, Store, Division, or Territory.
How to Add Classes in QuickBooks Online?
Now that you have enabled class and location tracking, let’s find out how classes are added to the online accounting software.
You can create a class field for the entire transaction or each row of the transaction. Here are the steps required for creating a Class for a transaction.
Step 1.
Select the preference icon from the home screen menu in QuickBooks Online. The option is accessible when you hover your mouse at the upper left corner of the screen.
Step 2.
You should next select All Lists from themenu and then click on Classes. If you have enabled the Track Classes option, you will see the following screen.
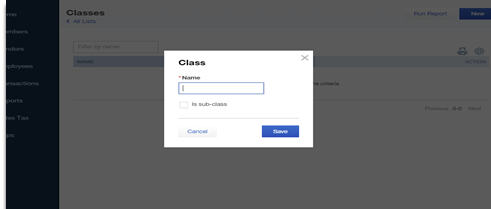
Step 3.
Create a class by clicking on the New button in the upper left corner of the screen. Next, type the name of the class. You can also specify whether you want the class to be a parent class or a sub-class. Leave the check box below the Name blank if you want to create a parent class. Select the checkbox if you want to create a sub-class.
Click Save once you have entered the class or subclass. The classes will be available for each transaction entered in QuickBooks Online.
Note: Classes should be based on how you want the transactions to be reported in QuickBooks. You can also create an ‘other’ class for transactions that cannot be classified into any group.
3. Correcting Negative Balances in QuickBooks Online
QuickBooks Online will show accurate accounting reports as long as you enter the correct information. But sometimes the accounting software will display wrong balances – and even negative balances – even when you have entered the correct amount.
A negative balance can occur when one of the checks used to make a payment was canceled and you created a new one. The accounting software will assume you have made the payment twice due to which a negative balance is shown in the accounts payable. This can also occur with accounts receivable if the customer sends you a new check when the old one was bounced back due to which a second check was issued.
To resolve the negative balance in QuickBooks, you should follow the steps outlined below.
Step 1.
Select Manage Accounts ReceivableorManage Accounts Payable in theAll reports tab. The tab is shown in the Reports menu in QuickBooks Online.
Step 2.
Next, you should click on Unpaid Billsor Member Balance Detail. Look at the report to find out the entry of checks that were canceled.
Step 3.
If you find the bill that was canceled or revoked, you should go to the Customer or Vendor menu as required. You should then locate the bill by entering the check number. Delete the bill so that the correct amount is shown in QuickBooks Online.
Note: If you were unable to locate the bill by check number, you should guess the time when you received or paid the canceled check.
Step 4.
Go back to the screen where the negative balance was displayed. You should go to the Unpaid BillsorMember Balance report in QuickBooks Online. The report will not be showing the correct amount.
Sometimes the negative balance is shown when you enter the bill but did not apply to the transaction. You should locate bills that were not applied by checking each bill. Make sure that every bill entered in QuickBooks Online is connected to the right account.
Wrong Opening Balance in QuickBooks Online
Incorrect opening balance can lead to inaccurate reflection of the company’s financial position. This happens when you create a Chart of Accounts and transfer opening balances when using the accounting software for the first time.
If you notice that the opening balance amount in the reports is not correct, you can follow the steps below to rectify the problem.
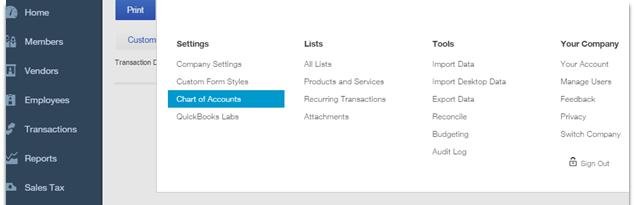
Step 1.
You have to open the Chart of Accounts to correct the wrong opening balance issue. Hover your mouse button at the upper left corner, and then click on Chart of Accounts as shown in the screen below.
Step 2.
You should next look for accounts with the wrong balance. Once you locate the account, you should click on View register as shown in the screen below.
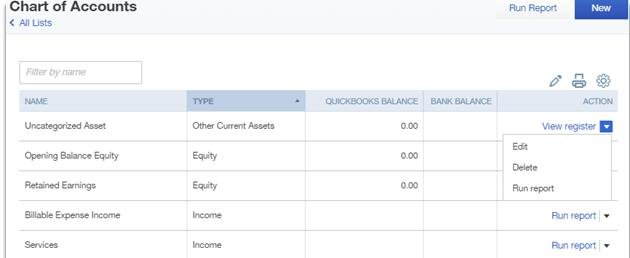
Step 3.
Click on Edit to change the opening balance amount in QuickBooks online. You should enter the correct balance. Click on the Save button to save the changes made to the account.
You should look at each account balance in the Chart of Accounts to ensure that the opening balance is correct. Make sure that you save changes when you modify the opening balance. The changes are not saved automatically in QuickBooks online. The changes will not be saved if you navigate to a different page without saving the changes.
Note: An important thing to remember when transferring opening balances is that you should enter the closing balance shown in the previous period balance sheet. A common mistake when creating the Chart of Accounts is entering the opening balance shown in the balance sheet to the opening balance of QuickBooks Online.
4. Reconciling Bank Accounts
You need to reconcile the bank statement balance with the balance shown in the Cash at bank section of the balance sheet. The bank accounts are usually reconciled at the end of each accounting period. But some businesses carry out this activity each year.
Step 1.
The first step in reconciling bank accounts is to go to the preferences menu. You should Reconcilein the Tools category.
Step 2.
Next, you should click on the bank account from the drop-down menu that you want to reconcile in QuickBooks online.
Step 3.
Look at the beginning balance amount in the Cash at Bank account in QuickBooks Online. The amount should tally with the previously reconciled bank statement account.
Next, you should compare the beginning and ending balances of the QuickBooks account with the current beginning and ending balance of the bank statement.
Step 4.
If the bank statement balance and the account balance don’t match, you should start tallying entries in QuickBooks online with bank statements. Also, look for the amount in the bank statement not recorded in your accounts.
Your bank statement and QuickBooks Online ending balances should match when you have tallied all the transactions and made the necessary entries.
5. Steps for Setting Up Recurring Templates
Setting up recurring templates will help you save time when entering accounting information. With the QuickBooks online feature, you don’t have to manually create invoicesfor each period. The accounting software will do the task for you.
You can create recurring transactions for any type of financial activity. The recurring template feature can be used for checks, invoices, and bills.
QuickBooks allows you to select a recurring transaction from a template or create a new one. Here are some steps for creating – and also stopping – recurring transactions using a template and creating a new one.
Recurring Transaction Template
Step 1.
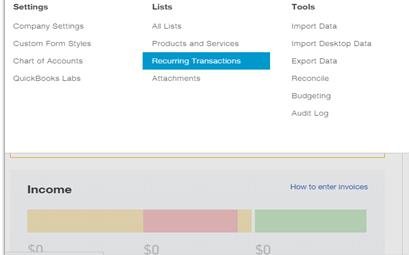
Click on the preference gear icon by hovering the mouse at the upper left corner of the QuickBooks online screen. You should then select Recurring Transactions from the drop-down menu.
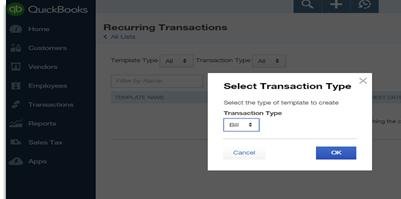
Step 2.
On the next screen, you can see a list of templates for recurring transactions. You should select a template for the recurring activity that you want to set up in QuickBooks Online.
You should make changes based on your specific requirements for the recurring transaction.
Step 3.
Next, you should click on Make Recurring button.
Custom Recurring Transaction
Step 1.
To create a custom recurring transaction, you should first click on the preferences gear icon in the upper left corner.
Step 2.
Click on the + button to create a new recurring template. You should enter the template name and then select Scheduled from the drop-down menu to specify the Type of the recurring template.
Note: The figure below shows the screen for creating a recurring check. The screen for recurring templates for other types of transactions will be similar.
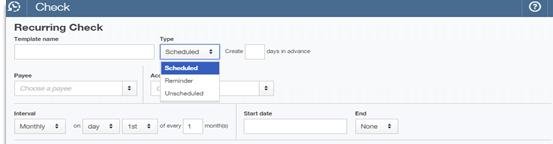
Step 3.
Enter details of the recurring transaction. For instance, if you are creating a recurring transaction for a check, you should enter the payee name and the amount.
If you are creating a recurring transaction for an invoice, you should specify whether the unpaid bill charge should be deducted and a reminder sent through sales. In addition, you can specify if the customer can make online payments through credit card or bank transfer.
Step 4.
The next important step is creating a schedule for the recurring transactions. You should specify the month, day, and frequency of the recurring transaction. Quick Books Online also allows you to set up start and end dates for transactions.
QuickBooks Online allows you to create unscheduled recurring activities as well. You can create a one-time transaction that ends on a specific date. The transaction is not repeated but executes on the specified day only.
Step 5.
Once you have made the required changes, you should click on Save Template to save changes. This step is important otherwise the changes in the transactions are lost.
Can You Create a Future Dated Recurring Transaction?
A great thing about QuickBooks Online is that it allows you to create future dated recurring transactions. You can create recurring transactions dated in the future for transactions that are highly likely to happen. As an example, you can create a recurring transaction for new bills that are due in a few weeks.
Note: QuickBooks allows you to not just create future dated recurring transactions but also create reminders.The reminders are sent to the recipients at the specified date.
Created a future dated recurring transaction allows you to perform cash flow analysis. You will know how much cash will be at hand and whether external financing will be required to meet financial obligations.
Suppose you want a recurring transaction to occur on the 20th of every month. But you want the transaction to start from next month. To create a future dated recurring transaction, you should enter the specific date in the Start Date section.
The cash flow statement will reflect the impact of the recurring transactions on your bank balance. In this way, you can take appropriate actions to plan your company’s finances.
The date of the recurring transaction on the report is when the transaction executes. The day when you create the recurring transaction is not reported.
How to Start and Stop Recurring Transactions?
An important point to remember is that recurring transactions won’t occur until you apply the templates. Here are the steps for executing the recurring transactions in QuickBooks Online.
Step 1.
Select the preferences tab by moving your mouse to the upper left corner of the screen. Now, click on the Recurring Transaction List.
You can also access preferences by clicking on the Gear icon located in the top left corner.
Step 2.
Next, you should select a recurring transaction and click on the Use button.
Step 3.
You should change the values if necessary and then click on the Save button.
Note: You can change the values of the recurring transactions. This will change the transaction amount for future dates. You have to manually change entries if you want to change the amount for previous dates as well since the previous amounts are not adjusted automatically.
Recurring transactions can also be stopped from executing in QuickBooks Online. Here are the steps to stop the recurring transaction from occurring on future dates.
Step 1.
Hover your mouse icon to the upper left corner of the screen, or click on the gear icon. You should next click on Recurring Transaction List.
Step 2.
Click on the recurring transaction you have previously authorized to execute, and then select Edit.
Step 3.
Next, you should change the template type from Scheduled to Reminder. This will prevent the transaction from executing in the future.
Step 4.
Now, click on Save Template. The app will send a reminder only from now onwards without executing the transaction.
6. QuickBooks Online Keyboard Shortcuts
QuickBooks Online shortcuts help save time in making bookkeeping entries. The shortcuts work on all popular internet browsers including Firefox, Chrome, and Internet Explorers.
Note: Mac users should use Control instead of CTRL and Option instead of ALT.
| Shortcut Keys | Actions |
| CTRL+ALT+i | Display invoice |
| CTRL+ALT+w | Display check |
| CTRL+ALT+e | Display estimate |
| CTRL+ALT+x | Display expense |
| CTRL+ALT+r | Display receive payment |
| CTRL+ALT+c | Display customers |
| CTRL+ALT+v | Display vendors |
| CTRL+ALT+a | Display chart of accounts |
| CTRL+ALT+l | Display lists |
| CTRL+ALT+h | Display help |
| CTRL+ALT+f | Search transactions |
| CTRL+ALT+x | Exit transactions |
| CTRL+ALT+c | Cancel |
| CTRL+ALT+s | Save and new file |
| CTRL+ALT+m | Save file |
Conclusion
We have come to the end of our guide on QuickBooks online accounting for accountants and small business owners. You have now learned how to set up and track classes and locations in the online accounting software.
After reading the guide you should also know about setting up sales tax rates and codes. In addition, you have learned about setting up recurring templates and reconciling bank statements in QuickBooks Online.
If you want to outsource bookkeeping services, you should contact Maxim Liberty. Our professional accountants can handle all bookkeeping-related tasks so that you can focus on strategic aspects of your business. Contact us today to know about our affordable bookkeeping fees. Keeping your accounts accurate starts with professional bank reconciliation services.
Frequently Asked Questions
What are the best QuickBooks Online tips for small businesses?
Set up your chart of accounts correctly from the start, connect all bank and credit card feeds, use rules to automate transaction categorization, reconcile accounts monthly, and generate profit and loss statements regularly to track business performance.How do I automate bookkeeping in QuickBooks Online?
Use bank rules to automatically categorize recurring transactions, set up recurring invoices for regular clients, enable automatic payment reminders, and connect your payment processor so deposits are recorded automatically. These features can reduce manual bookkeeping time by 50 percent or more.What is the most common QuickBooks mistake small businesses make?
The most common mistake is not reconciling bank accounts monthly. Unreconciled accounts lead to inaccurate financial statements, missed transactions, and problems during tax season. Setting a monthly reconciliation schedule is the single most impactful habit for accurate books.Should I use QuickBooks Online or Desktop?
QuickBooks Online is the better choice for most businesses in 2026 due to cloud access, automatic updates, and easier collaboration with your bookkeeper. QuickBooks Desktop still offers advantages for businesses with complex inventory or manufacturing needs.Do I need a bookkeeper if I use QuickBooks Online?
QuickBooks simplifies data entry but does not replace the expertise of a professional bookkeeper. A bookkeeper ensures transactions are categorized correctly, catches errors, handles reconciliation, and produces reliable financial reports your CPA needs for tax preparation.Ready to Cut Your Bookkeeping Costs?
Get a dedicated bookkeeper from $75/month with a 100% money-back guarantee on your first deposit. No setup fees, no lock-in contracts.